In Excel everything is not fixed,
you have the option to add, modify and change the data, the same with the
columns and rows. You have the option to insert and delete an entire column or
a row in a sheet.
In reciprocal to the deletion of
column and row, you can also add/insert column and row. So in this simple
tutorial, you will know how to delete and insert a column and row.
Let us start with Inserting and
deleting a Columns and Rows in a sheet.
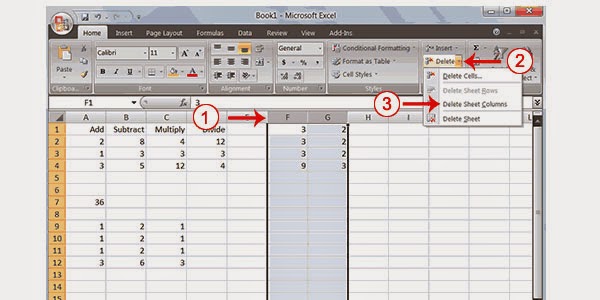
In this situation, we will delete
the columns namely “column F” and “column G”
Note: you can refer to the image
below..

- The first step is to click column F at the top portion then drag it up to column G.
- On the screen just click down the down arrow next to the “Delete” found at the cells group. Then a small menu will appear.
- Immediately choose and click “Delete Sheet Columns”. (This function will delete the entire column that you have selected.
- Click any cell in your sheet to remove the selection.
Now let us delete row 7 to row 12
in a sheet.
- The same process on deleting a column just click row 7 and drag up to row 12
- The same method, choose “Delete Sheet Rows” to delete the selected rows.
- Click anywhere to remove selection.

Inserting a column in an Excel sheet.
- Click the column A on your sheet to highlight entire column A
- Then the same process with deleting, until menu appears.
- Instead of choosing delete, this time let us choose insert to insert a new column
- Click anywhere.
Inserting Row in an Excel Sheet
Just follow the process in
inserting a column, but this time instead of clicking column click a row.
No comments:
Post a Comment